
Fortress Ridge
There’s something about Fortress Ridge that feels different to a lot of the more popular Blue Mountains walks. It’s quieter, more rugged, less polished and honestly… that’s part of the appeal.
*TRACK CLOSED* - 18/05/26 > 17/12/26
WHAT TO PACK: closed shoes, hat, sunscreen, water, foot, PLD, map , camera,, water shoes, swimmers, dry bag, rubbsh bag.
GUIDE TO:
Fortress Ridge Guide – Blue Mountains, NSW
There’s something about Fortress Ridge that feels different to a lot of the more popular Blue Mountains walks. It’s quieter, more rugged, less polished and honestly… that’s part of the appeal.
You won’t find fenced lookouts, busloads of tourists or perfectly paved paths here. Instead you get heathland ridges, massive valley views, sandstone cliffs and that feeling like you’ve stepped into the wild side of the mountains.
If you’re chasing dramatic scenery without the crowds, Fortress Ridge absolutely delivers.
Quick Info:
Location: Blue Mountains National Park, NSW
Distance: Approx. 10km return
Difficulty: Moderate
Time: 3-4 hours return
Track Type: Out and back
Dog Friendly: No (National Park)
Phone Reception: Limited in sections
Best Time To Visit: Sunrise, sunset or cloudy moody days
Parking Location Parking Coordinates: 33°39’54.2”S 150°23’12.4”E
There’s a small dirt parking area off Mount Hay Road near the Fortress Ridge trailhead.
Mount Hay Road is unsealed but usually accessible in a normal car during dry conditions.
After heavy rain the road can become rough with potholes, so drive carefully.
There are no toilets, bins or facilities here so come prepared.
________________________
step By Step Track Guide
1. Start At The Mount Hay Road Trailhead:
From the parking area you’ll see the wide fire trail heading out into the heathland.
The first section is fairly easy and open with only a gentle incline. It almost feels deceptively calm compared to how dramatic the views become later on.
The track here is easy to follow.
You will reach two forks in the trail;
at the first stick right along the main trail.
At the second you want to take the path on the left, this is where the track narrows.
(co ordinate for second fork 33.64782° S, 150.35974° E)
2. Follow The Main Fire Trail:
Along The Ridge Continue following the main trail as it winds deeper along the ridge line. You’ll start getting glimpses through the trees out towards the Grose Valley and surrounding cliffs.
This section has a really peaceful feel to it. Wide open heath. Scribbly gums. Sandstone shelves. And usually far less people than nearby Blue Mountains walks.
There are a few smaller side tracks branching off but the main trail remains obvious for most of the walk.
3. The Views:
the views Begin To Open Up Roughly halfway through the hike the landscape really starts showing off. The trees thin out and the cliffs begin appearing beside the track with huge valley views opening up around you. This is where Fortress Ridge starts feeling properly wild.
You’ll notice multiple sandstone outcrops where people stop for photos or breaks. Most are safe enough if you keep your distance from the edges, but there are also plenty of unstable cliff sections with sheer drop-offs.
Please don’t underestimate how dangerous the edges here can be.
4. Reach The Main Fortress Ridge Lookout Area:
Towards the end of the ridge you’ll arrive at the main lookout section. This area gives panoramic views over the Grose Valley with endless layers of cliffs stretching into the distance.
On cloudy days the valley often fills with rolling fog which honestly makes this place feel even more unreal.
Unlike a lot of lookout platforms in the Blue Mountains, this area feels raw and untouched. No barriers. No railings. Just open cliff edges and huge views. Take your time here because this is the best part of the hike.
5. Optional Side Track To Fortress Falls:
This is the section most people come for once they realize there’s more hidden beyond the main ridge. But this is also where the hike changes from a fairly straightforward ridge walk into a much more adventurous and technical route. The side track begins near the end of Fortress Ridge and drops down towards Fortress Canyon and the falls. It’s unofficial, unmaintained and significantly harder than the main trail.
5A. Descending Below The Cliff line:
Once you leave the main ridge track, the trail quickly changes. The path narrows, becomes rougher underfoot and begins descending through bushland before wrapping around beneath the sandstone cliff walls. This section feels completely different to the open ridge above. Instead of wide valley views, you’re now moving through darker shaded sections directly beneath towering rock walls. The cliffs almost close in around the trail in places which gives this section a really cool atmosphere. The footing can be uneven with loose rock and exposed roots so take your time through here.
5B. The Cave Photo Spot:
As you continue along beneath the cliffs, you’ll come across a small cut-out cave in the side of the rock wall just off the main path. You’ll know it when you see it because there’s a very obvious little track leading directly into it.
This has become one of the more popular photo spots along the trail and honestly it’s a pretty cool little stop.
It’s not a huge cave or overhang, more like a naturally carved hollow tucked into the sandstone wall.
A lot of people stop here for photos before continuing further towards the rope descent.
5C. The Rock Runway & Hidden Overhang:
As you continue along the cliff line track you’ll eventually reach the top of the rope descent area.
Before climbing down, there’s a rocky “runway” section to the left that leads out towards an incredible viewpoint overlooking the top of Fortress Falls and down into the canyon system below.
The views from here are easily some of the best on the entire hike.
This little "runway" runs between towering rock walls, and at its end there is a small rock overhand just to the left. It’s a really cool little section that a lot of people miss completely.
The overhang itself isn’t massive, but combined with the narrow passage leading into it, the whole area has a really unique feel.
As always though, this area has:
* No safety barriers
* Uneven cliff edges
* Loose sandstone sections
Rock can naturally deteriorate over time, so avoid climbing onto unstable edges or exposed sections for photos. The views and formations are still incredible without taking unnecessary risks.
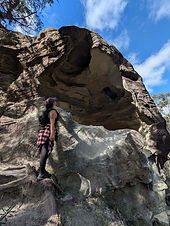
5D. The Rope Descent
Once you’ve explored the runway and overhang area, return to the main track and begin the rope-assisted descent.
From here the trail becomes much steeper and more technical.
The rope helps to lower yourself down the sandstone sections and you’ll need to use your hands carefully throughout the descent. Take your time here, especially after rain when the rock becomes slippery.
This section is where the hike really shifts from a scenic ridge walk into a more adventurous canyon-style track.
5E. Reaching The Canyon
After descending the ropes, the trail continues downhill towards the canyon floor. Eventually you’ll reach the creek area where many people accidentally head the wrong direction. When you reach the canyon, turn LEFT. Do not continue right.
There is a gorgeous clear canyon to the right which you can access though it’s not recommended unless you have experience canyoning or are with a professional touring company.
From here you’ll begin rock hopping downstream towards the falls and main pool area.
If you stick to the left and choose your line carefully, you should be able to keep your feet dry for most of this section until reaching the final pool itself.
The rock hopping section is actually a really fun part of the adventure and makes the whole place feel even more remote and untouched.
5F. Fortress Falls Pool Area
Eventually you’ll reach the pool above Fortress Falls. Massive canyon walls rise around you and the whole place feels hidden away from the world. Depending on recent rainfall, the water flow can vary massively. After rain the falls become much more dramatic, while in drier periods it can feel quieter and more peaceful. After heavy rain the pool itself is an unsafe destination. What Makes Fortress Ridge Different? Fortress Ridge isn’t one of those hikes where there’s a massive landmark at the end and that’s the whole experience. The actual walk is the best part. The slow build-up of scenery. The quietness. The feeling of isolation along the main trail. The dramatic cliffs appearing more and more as you continue. It feels like old-school Blue Mountains hiking.
__________
Track Conditions
Things to know before you go:
* Mostly exposed track with limited shade
* Can become very hot in summer
* Rocky uneven terrain in sections
* Cliff edges throughout the hike
* Strong winds common near the lookout areas
* Side trails are unmaintained
* No water sources along the main ridge Avoid this hike during storms or extremely windy weather.
Things To Bring:
* Plenty of water
* Snacks or lunch
* Hiking shoes with grip
* Sunscreen
* Hat
* Jacket
*Offline maps
* Camera
*If you plan on exploring towards Fortress Falls, proper footwear is essential.
Safety Tips:
This place is beautiful but it’s not somewhere to take unnecessary risks for photos.
A few important reminders:
* Stay back from cliff edges
* Sandstone can break unexpectedly
* Avoid climbing unstable rock formations
* Be careful after rain
* Tell someone where you’re going
* Don’t rely on phone reception
* Check NSW National Parks alerts before visiting
⸻
Final Thoughts:
Fortress Ridge feels rugged in the best possible way. No tourist infrastructure. No perfectly curated viewing platforms. Just massive cliffs, wild valley views and that feeling of proper adventure.
And honestly, those are usually the hikes that stick with you the most.
This is a great spot to stop, relax and soak in the atmosphere before beginning the climb back out. Just remember: You have to climb everything back up.
And that return ascent definitely feels harder on tired legs.


Call
Follow